Monthly Archives: May 2013

3-Weight’s “go-to” panfish patterns

Andy Satanek a.k.a. 3-Weight shows us his “go-to” patterns for spring panfish. More information is available at Andy’s AMflyfishing website.

It’s that time of the year, sliding into the kayak with the 3-weight in the pursuit of Northwest Indiana panfish (bluegills, redears, and pumpkinseeds).  Not only are panfish fun to catch and plentiful, the selection of flies needed are non-complicated and quick ties.  Below are my “go-to” patterns (materials are listed in the order they are tied-in).

Teeny Nymph Natural

Teeny Nymph Natural

Teeny Nymph (size 10 shown)
Hook – TMC 3761 (1X long, 2X heavy)
Sizes – 8 to 12
Thread – Black
Body – Ringneck pheasant tail fibers
Legs – Ringneck pheasant tail fibers (fibers from the body are tied back and down)
Head – Black thread

Foam Fly Yellow 10

Foam Fly Yellow 10

Foam Fly (size 10 shown)
Hook – TMC 100
Sizes – 8 to 12
Thread – Yellow
Tail – Black bear hair
Legs – Black round legs
Body and head – Yellow closed cell foam, 1/8” thickness

Alternative body colors – black, orange, white

AMS Cap Spider

AMS Cap Spider

Cap Spider Variant
Jig Head – 10# / 124 ounce
Thread – Black
Butt – Chartreuse floss
Body – Black rabbit dubbing

Cap Spider Pattern originator – Michael Verduin
In the early 2000’s, Michael captured three National Bream Tournaments (US) fishing only Cap Spiders.  Fish the Cap Spider with a long leader … using tiny strips to drag the fly along the bottom.  The jig head allows the hook to ride-up making it nearly snag-proof.

AMS Spider

AMS Spider

Foam Spider (size 10 shown)
Hook – TMC 100
Sizes – 6 to 12
Thread – Black
Body – Black foam spider body (Waspi)
Legs – Speckled orange round legs (Waspi)

The Foam Spider is one of the most popular surface bugs for catching panfish.

Leave a Comment

Filed under Panfish

Red Devil Streamer

Pattern by Carrie Stevens

Tied by Mike Boyer


To read more about Mike head over to his website:
http://www.favoriteflies.net/mikes_site/page/home.htm

Mike’s flies are for sale here. There are some beautiful flies to see on this site from Mike and others.
http://www.displayfliesmarket.com/marketplace/the_marketplace.html


Hook: Gaelic Supreme Mike Martinek size 1 8xl or similar streamer hook
Thread: UTC 70 denier white and UTC 140 denier white
Tail: red dyed Goose or Duck
Body: red silk floss
Ribs: flat silver tinsel (metal)
Belly: white Bucktail
Throat: red schlappen hackle
Wing: red over blue hackles
Shoulders: barred Wood Duck
Cheeks: Jungle Cock

1. With the hook in the vise, start your thread near the eye, leaving space for the head. Wind thread back towards the tail, keeping the thread flat by counter spinning the bobbin every 10-15 wraps. It’s important to keep flat wraps for the silk body. When you reach the tail area, tie in matching (left and right) slips of red dyed Goose. Secure with four wraps of thread, then trim the butts closely. Add one or two wraps to cover the butts, then wind the thread back towards the head with the same flat wraps. You should burnish the thread body now. The best burnishers are polished Agate stones. I use a stainless steel dental instrument. A polished dowel or perhaps a polished back of a spoon might work. The idea is to keep the layers of thread flat.

Red Devil Step 1

2. Change thread to UTC 140 to build up a tapered body. This will take about four layers of thread, making sure the bobbin is counter spun as before. The first two layers of 140 denier will stop short of the bump of the tail butts, so that the bump is compensated for. The next layer will cover the tail butts. Wind back to the head area and start a taper by winding down about three quarters of the body, flattening and spreading the fibers, and reversing the thread back towards the head. Do this a couple of times, making each turnaround shorter. This should create a nice taper. Remember to burnish throughout. Change over to the 70 denier thread, and wind back to the tail area. Tie in a length of flat silver tinsel, and the red silk floss. I load my floss on used spools and load into the bobbin holder, for ease of handling the single strand silk floss. Again wind the thread back towards the head, using close, flat wraps. One more burnish.

Red Devil Step 2

3. Using tight, flat wraps, carefully wind on the silk floss. Tie off, burnish, then wind on the flat silver tinsel and tie off and trim butts. Start coloring the white thread with a black marker, or switch to black thread.

Red Devil Step 3

4. Tie in a small bunch of white Bucktail. It doesn’t hurt to stack the hair a bit, and remove any wild hairs. Trim the butts, then advance the thread to exactly beneath where you want to set the wings. This way, when you tie in the red schlappen throat, it will be on the same vertical plane as the wings.

Red Devil Step 4

5. Select two blue, and two red hackles for the wings. I prefer saddle hackles, but some neck hackles would work. Measure to length, pull the fibers back, and trim them. Smash the stems together crossways with flat pliers. Tie the wing on and adjust until you get the look you want. Carrie Stevens tied in her hackle wings much lower, even covering the body. I prefer a higher wing set. Trim the wing butts.

Red Devil Step 5

6. Select and tie in left and right Wood Duck, then matching Jungle Cock feathers. With a well waxed thread, form a neat head. I use three or four coats of Sally Hansens clear for a nice finish.

Red Devil Step 6

Leave a Comment

Filed under Step by Step, Streamers

Supercluster – Paul J. Beel

Supercluster

Supercluster

I have already posted my new articulated streamer on the FrankenFly Facebook page, but a lot of people aren’t on Facebook, so I thought I would post it on the main site. Since the beginning of spring I’ve wanted to put together a new streamer to use for bass around here. This could also be used for trout too, but bass were my main focus.

I went through several incarnations of this fly. When I experimented I wouldn’t be happy with the movement or it wasn’t bulky enough in certain sections, or it just wouldn’t flow right, etc. So this is the result.

Here are a few things I was thinking through the design process. I wanted the peacock in the back to sit up a bit more, so this was the reason the olive bucktail was added. If you haven’t noticed lately, I use a lot of raccoon tail in my flies. I think it’s especially good to use on nymphs and streamers because the fibers shed water really well. The part that I really started working around from the start was the Spirit River UV2 Super Schlappen. I was surprised with these feathers. As I pulled them out of the bag I couldn’t get over the feel and shininess of these feathers, so I just had to use them somewhere. Since they had the right thickness, I chose to use them for the tail. Anyway, here are the materials included in the entire fly.

Materials list:

two – Gamakatsu B10S Stinger hook – size 1
Tail – Spirit River UV2 Super Schlappen

Back hook –
Raccoon tail
Spirit River olive bucktail
Peacock
Red squirrel tail
Spirit River chartreuse bucktail
Loon Outdoors UV Clear Fly Finish

Front hook –
Raccoon tail
Red squirrel tail
Spirit River UV2 grizzly soft hackle olive
Spirit River chartreuse bucktail
Senyo Laser Dub – tan
Senyo Laser Dub – olive
Senyo Laser Dub – white
Fish Skull Living Eyes – Wind


8 Comments

Filed under Largemouth, Streamers

Schultzy’s Red Eyed Leech – Mike Schultz

RedEyedLeech

Schultzy, Owner and Head Guide of Schultz Outfitters in southeast Michigan is the creator of this fly. They spend a lot of time chasing smallies at Schultz Outfitters, so the Red Eyed Leech fits right in. I like the fact that Mike used a dubbing loop containing rabbit to construct the head of this fly. Here’s the information that Schultzy sent.

Recipe:

Hook: Daiichi 2546 Size 4-1/0
Eyes: Hareline Pseudo Eyes or Spirit River Real Eyes Plus (They are the same product) RED 7/32″ or 1/4″ for you hot shots

NOTE: The hook rides up, Eyes go on top of the hook like a Clouser!

Tail under flash: Copper or Gold Flashabou Splash
Tail/ Body: Rabbit Strip approx 2-3″ off the rear. Puncture the leather and strap in using repeated wraps on top of each other. Use the excess strip and continue to wrap a body up behind the eyes. Tie off!
Collar: Mallard or Wood Duck Flank wrapped 2 to 2.5 x’s. Lady Amherst in a dubbing loop works as well.
Head: Rabbit trimmed from the hide and spun in a dubbing loop.

TIPS…
Adding Extra Weight – If more weights desired, I prefer to use a extra large brass or a tungsten bead behind the eye. This needs to be placed on the hook first.
Lead wire is also an option, however it takes more time.

Spun Rabbit Head- Use the longest stuff you can find!
Magnum strips are nice for the spun head since they require a shorter cut.
Using 4.5″ or longer Hair scissors helps.
Use a dubbing twister with a high quality bearing.. The Stonfo Roto Dubbing 2 is the BEST spinner on the market!
Thin out the rabbit once in the loop, Less is more!

Colors – Black, Olive, Tan or Chocolate Brown are tough to beat

Stop by the shop if you have any questions or need help with this one!

Leave a Comment

Filed under Smallmouth

Grillos’ Hamburgler – Andrew Grillos

Andrew is a signature tyer for Idylwilde Flies and ties some wicked cool flies. This is the first Grillos fly highlighted here on FrankenFly, but Andrew has already agreed to send more of his creations this way. For guided trips, fly tying lessons, and fly casting lessons Andrew Grillos can be contacted at: andrewgrillos.com.

Hamburgler

Hamburgler

Like many of my flies the Hamburgler was created to fill an empty niche in my fly boxes.  I always liked fishing beetles and never really came across a pattern that was buoyant, durable, and easy to see.  I began messing around with a two layer foam beetle.  The first versions had no wing and fished great, but I had a tough time seeing them.  I love to add neon pink mcflylon into my flies whenever possible because I think it’s one of the best indicator post materials around.  It’s buoyant and bright!  By adding the little neon pink wing to my beetle I turned what’s typically a tough to see pattern into a beetle that just about any angler can fish effectively regardless of their skill (or vision) level.

The hot pink wing may seem kind of loud to some anglers, but you must remember which side of the fly the trout is looking at.  They don’t really even know that bright wing is on there since fish just see the underside of the fly.  The name Hamburgler is just a funny name that really doesn’t have any thing to do with the pattern.  The other name that I considered for the fly was The Pinkeye Beetle, but for some reason Hamburgler stuck!

This pattern has been a great producer for me here in Washington as well.  I’ve got quite a few small streams that are within 90 minutes of Seattle where we can catch dozens of small trout in a day trip.  Creeks that are perfect for fiberglass 3 weights and smallish, durable, foam dry flies.


FLY NAME:    The Hamburgler (foam beetle)

SIZE:    12 and 16
Material Specs:

Hook:    TMC 3761
Thread:    UTC GSP 100, Black
Underbody:    Peacock Ice Dub
Body:    2mm foam, black
Overbody:    2mm foam, black
Legs:    fine round rubber, black
Wing:    neon pink mcflylon
Head:    Overbody foam, tied down to hook eye then pulled back over
Eyes:    medium round rubber, neon pink

Special Tying Instructions:   
The underbody layer of foam should be cut slightly narrower than the hook gap and tied in segmented style (segmented just like the fat caddis’ underbody).  The overbody foam should be about equal to or slightly (slightly!) wider than the hook gap.

Below is a client putting the Hamburgler into action!

grillos-creek

Leave a Comment

Filed under Foam

Flies & Tactics for the cold spring days – Alan Bithell

Ghiubhais Sun Small

Nature, not the calendar, should tell us when the fishing season starts. This year it has done precisely that! It has been a cold start, and a very late spring. For those of us that fish the Highland lochs of Scotland for wild brown trout there has been little point venturing out.

In the last few days the tree outside my living room window has burst into life. Looking at it my thought is “about time”. The fishing season is almost two months old, and despite our best efforts has only netted one brown trout. Four days ago at a club social competition it actually snowed.

Anyway spring is here, so now we can start, but where and how? In the early days there is little surface activity. On colder days we are often tempted with sunk lines, and other such snares for the soul. Usually I resist this temptation by the simple expedient of not carrying them with me. Typical tackle for an early season day is a long, 10 foot, rod for a 5 or 6 weight floating line, and lots and lots of layers of clothing.

Ghiubhais_0004 SmallTM

As the water warms the trout move up in the surface more. This gives us the top water sport we so enjoy later in the season. As many of our waters freeze over in the winters they are still cold now. It is a fact that I do not hear mentioned much in fly fishing, but the water at the bottom of any large body of water, even with the surface frozen, will be at 4˚c. This will be the case so long as the water doesn’t freeze totally. 4˚c is the temperature that equates to the smallest volume for liquid water. Therefore it sinks down to the bottom. Often times you must reach this warmer layer to find active trout.

Sinking lines may be the first thing you reach for when thinking of fishing deep. I want my flies deep, not my line. So I use flies that will fish deep. Fortunately the Highland lochs are generally not very deep. Loch Farlary, for example, is barely deep enough to permit float tubing. A heavy, or should I say dense, fly will get down enough to put you in touch with trout.

Saying there is no surface activity is… well you know, a trout will do anything to prove you wrong. The surface is still a base that should be covered. It is normal practice to fish a team of flies on our lochs, most commonly 3, but 4 in favourable conditions. That means it is easy to cover a range of depths with a standard setup.

Perhaps the best way to illustrate the differences in early season is to look at the flies we use and where they go on the leader. First here is my typical leader setup. Make it as long as you can manage. However don’t exceed about 15 feet between bob fly and point, or you will have difficulties landing fish. The bob fly catches in your tip ring and you still can’t reach the fish to net it. We would laugh at you!

becdd339

Lets start with the point flies. These are slimmer flies, which are always designed to sink a little. The ones for colder times are designed to sink quite a bit. Winged and “spider” wets are ideal in this position, we also use a couple of nymphs. What has surprised me is that we have never had any success fishing buzzer (midge) patterns. If they work on your waters then some wire body buzzers will get down quickly.

Buzzers

Here are the point flies we use in their early season version and the “summer” version.

To start with two spider patterns. The Black Pennell, and the Tavy Terror. The usual sizes for these are 10 to 14. [The Spring dressing is on the left compared with the summer dressing on the right]
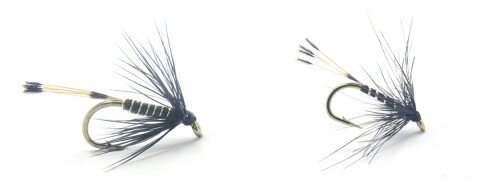
 

Black Pennel
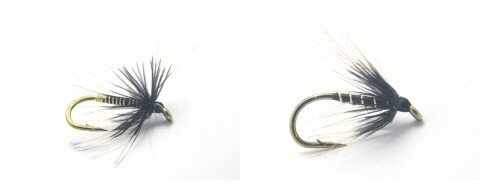
Black Pennel


Tavy Terror

Tavy Terror


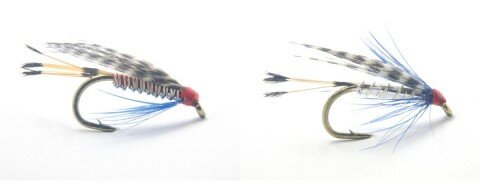
If you want a brighter fly the Teal Blue and Silver, or the Peter Ross are good.
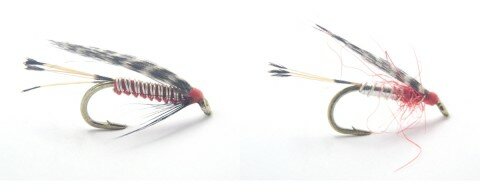
Peter Ross
Peter Ross


Teal Blue and Silver

Teal Blue and Silver


Another good one for the point is the Hendricks’s Spider; we don’t have a summer version for this fly. Hmm maybe we should.
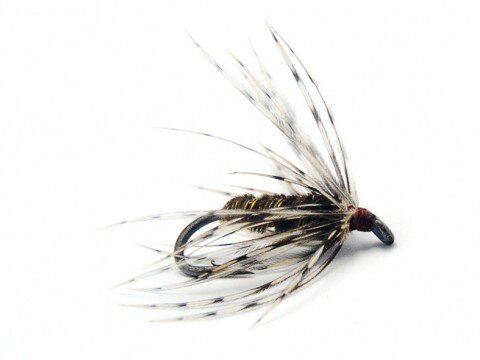
Hendricks Spider

Hendricks Spider

Two nymphs we have found that work well when you want extra depth are a Wire Woven Copper John and my By Colour Nymph with a bead head. The WW Copper John is a very heavy fly that can be used for a stalking bug.
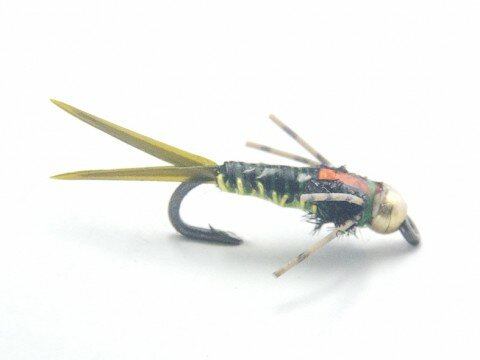
 

Wire Woven Copper John

Wire Woven Copper John


This is another we do not use in a lighter dressing of in the summer. It is purely a fly for getting down deep, anytime. It was also the fly that took my first fish of this season.

The Middle Dropper. This is always the hardest of flies to choose; bushier than the point flies but not as bushy as the top dropper (bob) flies. These flies are usually not weighted. The summer versions of the point flies can be used effectively in this position. Using these flies here saves dressing a set of flies specially.

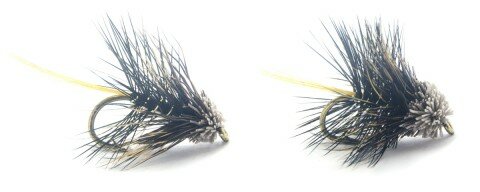
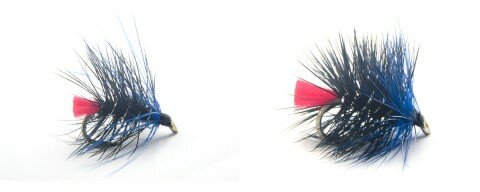
Top Dropper or Bob Flies. Here there is also a big difference between early season flies and those for later. There are a lot of traditional top dropper flies. I couldn’t begin to make a list of them all. I’ll show you three in spring and summer guise, then you can see the difference in style between the two.
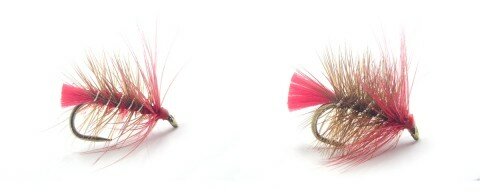
 

Cardinal Palmer
Cardinal Palmer


Muddled Kate MacLaren
Muddled Kate MacLaren


Blue Zulu

Blue Zulu


The idea here is that the summer dressing will wake across the surface and may bob under when pulled. The spring dressing will sit more down in the surface and may bulge the surface when pulled.

A team of flies is much more than the sum of its parts. The flies work together. On one occasion last year I fished a Muddled Kate on the top dropper. Though I caught good numbers of fish none took the Muddled Kate. It would have been folly to take it off the cast though. Fish were coming to the muddled Kate, turning short, and taking one of the other two flies on the way down. That’s real team work.

Another tactic we have worked out involves the fishing of just two flies. In early season many people resort to pulling lures. Something we are not best pleased with. This is our answer to that. I’m probably going to be in trouble for sharing this, but Mike has enough “secret” flies. This one’s mine, so I’ll tell you about it. The Orange Rough Fly.
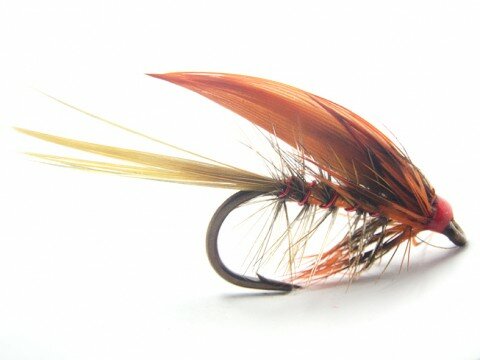
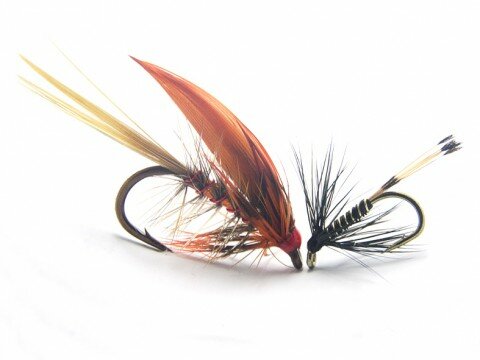
Orange Rough Fly

I know it looks traditional enough but here is another photo of it along side a standard size 12 Black Pennell. The secret is it is tied on a Mustad R90 size 6!
Orange Rough 2

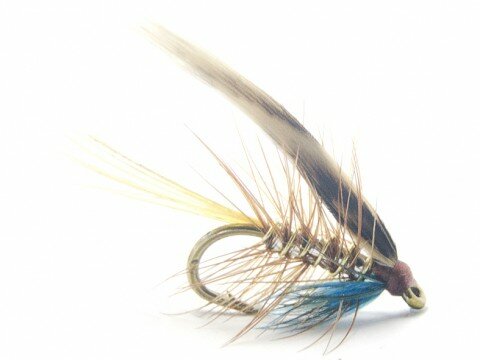
Fish this quite fast, with a smaller imitative pattern like a Silver Invicta above it.
Silver Invicta

Silver Invicta

Keep going right into the bank or boat with your retrieve. Takes will often come as you lift off. Sometimes the fish will chase the Rough Fly then power ahead and take the smaller fly. It certainly wakes them up!

Don’t expect too much from the early season, especially if the spring is as late as it has been this year. Though slow, sport can be had. After all, “A bad day’s fishing is better than a good day at work”.

When I told Mike that I was working on this article he said “Ho that’s easy, just write, “Come Back In June!””

Cheers,
Alan.

8 Comments

Filed under Trout flies

Garbage Bag Sulpher Dun – Jim Misiura

I ran across this video while browsing through fly tying videos on YouTube. I love the garbage bag wings on this, so I just had to post it. They give the fly a terrific profile. So save those plastic grocery sacks and tie yourself a Garbage Bag Sulpher Dun!


Leave a Comment

Filed under Trout flies

Skykomish Sunrise

skykomishsunrise

This is a classic steelhead fly created by a father and son. Here is an excerpt from the famous book by Trey Combs, Steelhead: Fly Fishing to tell the story.

“Ken and his son, George, were driving east to the Skykomish River one January morning in 1936. The sun was coming up over the snowcapped Cascades, a splendor of red, yellow, and white. “Tie me a fly with those colors in it,” Ken told his son. That evening, George used red tying thread to secure a mix of red and yellow hackle, a red wool body, and a white polar bear wing. The completed fly was named the Skykomish Sunrise. George christened the pattern with three winter steelhead from a single pool near Monroe. The day included a seventeen-pounder. The new fly became a sensation.”

Recipe:

HOOK: 7999, sizes 2-8

THREAD: Red

TAG: Flat silver tinsel

TAIL: Red and yellow hackle fibers, mixed

RIB: Oval silver tinsel

BODY: Red chenille. Angora goat dubbing may be substituted.

HACKLE: One red hackle and one yellow hackle, wound together

WING: White calftail

CHEEKS (OPTIONAL): Jungle cock

4 Comments

Filed under Steelhead

The Chromie

Brian Chan, a fisheries biologist in British Columbia designed this pattern to mimic chironomids. His good friend and fellow stillwater fly fisher Phil Rowley shows how to tie The Chromie in this video. I recommend listening closely while Phil ties, because he explains this pattern in great detail.

If you’re wondering what a chironomid is and why this pattern is important, Brian Chan has an article with photos that go perfectly with this video over on his website. He also explains how to fish this pattern in the article.

Be sure to visit Phil Rowley’s website too. Phil is a very good writer and has many helpful fly fishing articles available on his site.


Leave a Comment

Filed under Trout flies

DBise Sculpin – Dustin Bise

dbise


Dustin Bise of Big R Fly Shop was nice enough to send me this cool pattern. I think the rattle you would get out of this fly would be killer. Check it out!

Recipe:

Olive barred zonker
20lb maxima (bead cord)
UV Polar Chenille (body)
Tungsten beads
Spun Olive deer hair trimmed to sculpin shape.

Instructions:

Start at the bend and tie in 20lb maxima and chenille.
Wrap chenille forward
Attach beads over Maxima
Pull Maxima forward and tie in
Pierce a zonker strip through the hook then tie in behind head
Spin deer hair and cast!

Leave a Comment

Filed under Streamers