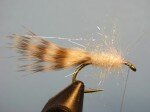
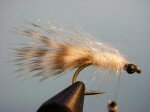
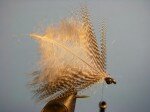
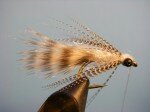
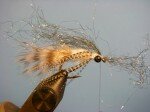
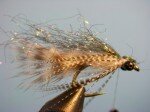
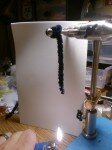
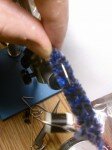
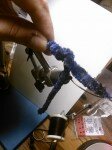
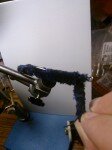
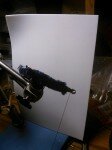
This is an excellent carp fly which is an adaptation of my original McLuvin by Eric Bebee at Catch Fly Fishing. I have had allot of luck fly fishing for carp with the SH McLuvin in many scenarios but have had the most luck using it on sand and gravel flats or sand-bars when the carp are keyed in on crayfish. I have caught grass carp, mirror carp and common carp up to 20lb with the Sculpin Helmet McLuvin. This fly uses the FlyMen fly fishing mini sculpin helmets. This is a relatively heavy carp fly and is best suited to situations where indirect presentations are effective. Examples include distant slow cruisers where you can lead the fish, close-in tailers and cruisers where you can perform a drag and drop presentation and any carp in water over knee deep. http://www.flycarpin.com
Monthly Archives: September 2013
Freckled Marabou Steelhead Tube Fly – Tony Torrence
Tony Torrence is back at the vise in a new tying video from Caddis Fly Shop in Oregon. I enjoy Tony’s fly tying and he shows us in this video how to tie a nifty tube fly for steelhead. The recipe is at the end. Check it out!
Filed under Steelhead, Step by Step
The Dettes

Walt Dette
Walt approached Rube Cross and offered $50 to be taught to tie flies. “I also told him that if he taught me, I wouldn’t tie flies commercially and even promised not to share his techniques with others, ” says Walt. “He told me to go to hell.” The art of tying flies was a jealously guarded secret at the time. (The year was 1927.)
Undaunted and determined, the young Dette learned the Cross method by painstakingly untying and retying Cross, and other, flies. In so doing, he made himself master of the art and kept the tradition alive.
Unlike Cross, however, Walt, Winnie, and in turn their daughter Mary share the techniques with any and all. In fact, their techniques have spread from the East to the South and West, and just about anyone tying flies today has, in some fashion, been influenced by Walt’s untying of the Cross flies.
This excerpt was taken from Eric Leiser’s book, The Dettes, A Catskill Legend. In between my other tying, I have been studying Catskill style dry flies and their history. I’m not yet able to tie display quality Catskill style dry flies, but I plan to get there. This book and Mike Valla’s book, Tying Catskill Style Dry Flies are inspiring to me. For those of you who don’t know, The Dettes fly shop is still open. You can visit their website by clicking the link on the left hand side of FrankenFly. The shop is run by Mary and her grandson, Joe Fox. I contacted Joe and asked him if he would send me some photos of flies tied by each of them and he sent me the beautifully tied flies you see below. I have included recipes for each and I hope you enjoy them.

Conover – tied by Joe Fox
Tied in sizes 12 – 18
Hook: Mustad 94840
Thread: White waxed 6/0 (8/0 for small sizes) (UNI tan works well)
Tail: Cream (straw shade)
Body: Muskrat and red wool blended to heathery claret gray
Hackle: Golden badger (no black edge)

Delaware Adams – tied by Walt Dette
Tied in sizes 10 – 16
Hook: Mustad 94840 or equivalent
Thread: White waxed 6/0 (8/0 for sizes 14 and smaller) (UNI tan works well)
Wings: Rounded grizzly hackle tips (or hen tips)
Body: Medium olive wool palmered with grizzly hackle (medium olive dubbing fur may be substituted)
Tail: Grizzly hackle fibers
Hackle: Grizzly and brown mixed

Dette Caddis – tied by Mary Dette
Tied in sizes 12 – 18
Hook: Mustad 94840 or equivalent
Thread: White 6/0 waxed silk or UNI thread
Egg sac: Medium olive chenille (related to hook size)
Body: Muskrat dubbing
Wing: Brown partridge
Hackle: Dun and brown mixed

March Brown – tied by Winnie Dette
Tied in sizes 10 – 14
Hook: Mustad 94840
Thread: White waxed 6/0 or UNI thread
Wing: Wood duck flank
Tail: Dark ginger hackle fibers
Body: Sandy beige fox-fur dubbing
Hackle: Dark ginger and grizzly mixed
Filed under Catskill, Trout flies
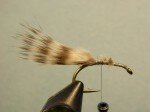
Fonzi Fry – Ted Kraimer

Each year as millions of salmon eggs turn into salmon, both steelhead and trout take notice and advantage of these naive, freshly hatched “minnows.” I originally developed this fry pattern for steelhead, but it didn’t take long for the trout to convince me they like it too, making it a staple in my fly box.
Materials needed:
Hook: TMC 2457 #8
Thread: Gray Uni 6/0
Tail: Grizzly Marabou
Body: Ice Dub – pearl
Thorax: Ice Dub- pearl
Collar: Teal Feather
Eyes: Bead Chain – Black, Small
Back: Ice Dub – peacock
-
- Step 1. Wrap base layer of thread to above hook barb.
-
- Step 2. Tie in tail – length to be as long as hook itself. Tie off.
-
- Step 3. Dub ice dub body, loosely, 2/3rds up shank towards hook eye.
-
- Step 4. Tie in Eyes just behind hook eye on underside of the hook
-
- Step 5. Tie in teal collar by the tip and fold, wrapping at least once just in front of the dubbed body.
-
- Step 6. Dub in front of the teal and around the hook eye.
-
- Step 7. Prepare some peacock ice dub and tie in so it extends forward, over eye, wrap down behind hook eye, then move thread behind eyes.
-
- Step 8. Pull Ice Dub back towards hook bend and tie down. Whip Finish.
Filed under Steelhead, Step by Step, Trout flies
Fat Albert
This fly has become a popular pattern especially when fish are concentrating on terrestrials. Here is a good description of this fly given by Charlie Craven. Follow the link at the bottom if you are interested in viewing the step-by-step tied by Charlie. The pattern itself was designed by Brent Taylor.
“The Fat Albert comes from the vise of Brent Taylor of Kansas City, Kansas. This big fat bug came to me recently in a fly swap and it really caught my eye. I have been hearing of this pattern for a few seasons now; used as the dry in a dry/dropper rig. From the looks and construction of this fly, I can tell you the thing is gonna float like no tomorrow. There are about 9 millimeters worth of closed cell foam stacked on this fly, which makes for that magic proportion of a whole lota foam and a little bit of hook. The overall profile of the Fat Albert could imitate a hopper, stonefly adult or cicada with equal aplomb. Try this fly with black and tan foam or even orange and black for a couple different combinations sure to catch the fishes eye. It seems that Mr. Taylor was also a guide in Chile for a time, which falls right into place with this flies general characteristic of an enormous terrestrial.”
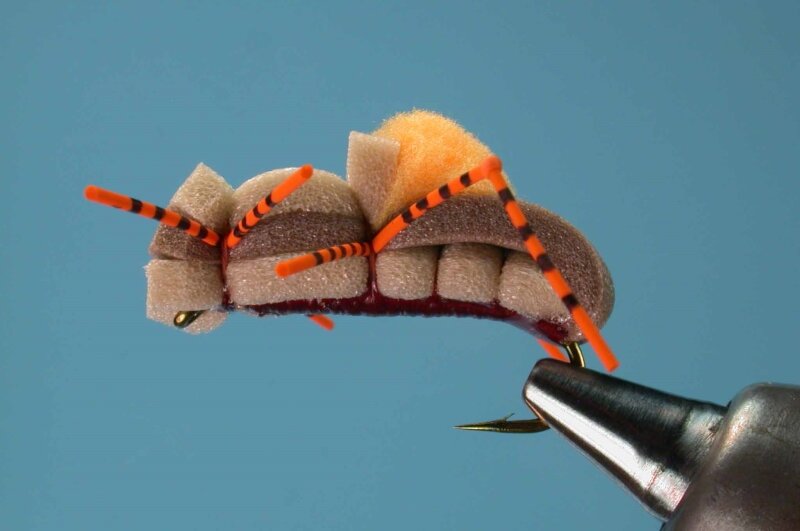

Materials Needed:
Hook: TMC 5262, 2302 or 5263 #4-10
Thread: 140 Denier Rusty Brown
Body: 1/8 Foam, Tan and Brown
Indicator: Brightly colored McFlyFoam
Legs: Round Rubber Legs
Link to step-by-step by Charlie Craven
Filed under Hoppers, Trout flies
Orange wet fly
I haven’t tried this fly, but it looked like a nice little fly by Krystian Niemy. It is to be tied on a wet fly hook. Krystian recommends this fly for perch or rainbow trout.

Materials:
Hook: Hanak 260BL no. 8 (any wet fly hook in a size 8)
Thread: black UNI 8/0
Eyes: silver Twin Eyes
Tail/body: orange marabut
Dubbing: black Hareline Angora Goat
Filed under Panfish
Salmon/Sea Trout Tube Fly – Daniel D. Holm
This is a beautiful pattern tied on a tube by Daniel D. Holm. Daniel is danish and an excellent tyer. I hope you like this one, I did.
Filed under Salmon, Step by Step
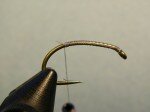
How to tie a WD-40
Hook: #18-24 Tiemco 2487
Thread: UTC 70
Tail: Wood Duck Mallard Flank
Thorax: Olive Superfine Dubbing
Casing: Wood Duck Mallard Flank
Body: UTC 70 Thread
Filed under Step by Step, Trout flies
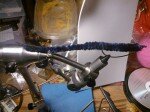
Senko worm imitation
Executive Director of the Illinois Smallmouth Alliance, Rich McElligott, came up with this imitation of the Senko plastic worm. For those of you who are not aware, the Senko is a popular lure in largemouth bass fishing. Rich has come up with almost the perfect imitation by using a type of yarn. The sbs below is courtesy of the BrookfieldAngler.com. I’ve tied this fly myself and it’s is a simple fly to tie once you get the process down.
Hook: 1/0 wide gap worm hook (regular bass hook)
Thread: 210 Denier (match color to fly)
Body/Tail: Patons Bohemian Chenille
-
- Start by cutting 2 pieces of chenille. 1 piece at 9″ and the other at about 5″
-
- Next, using a lighter or candle, melt one tip of the 5″ piece of chenille. This is just to keep the tail from fraying.
-
- Melted tip.
-
- Now, placing the hook in the vice hook point up (pay no attention my photo that shows it down) start your thread at the eye and end with the thread against the corner of the bend.
-
- Take either piece and tie it in on either side of the hook.
-
- Next tie in the other piece on the opposite side that you tied in your first one. Once both pieces are tied in, pull both pieces back past the hook bend making sure that the hook is surrounded on both sides. Then pinch both pieces with your fingers.
-
- Next, leave a little bit of slack in the chenille between the hook point and the hook eye and use a clothes pin or other clip to hold the chenille to the hook.
-
- That should leave you with two pieces of chenille dangling off the back of the hook. If you are right handed, hold the shorter piece with your left hand and using your right hand, wrap the longer piece 6 times starting at the hook and going towards the tail around the shorter piece in your left hand. Then wrap it 6 times forward. Note: The wraps will only go back a couple of inches and not all the way to the tail.
-
- Next, remove the clip and continue wrapping between the longer piece of chenille around the shorter piece between the hook bend and the hook eye. This takes a bit of nimbleness until you get past the hook point. The good thing is that this won’t unravel if you have to let go for a second. Wrap all the way to the hook eye.
-
- Once you get to the hook eye, tie it off with a couple of wraps, cut the excess chenille away, and build a nice head. Whip finish and cut the thread.
-
- For the final step, take some watershed – or similar product – and apply it to the last inch of the tail.
-
- This allows the fly to have a tail up stance when falling through the water column and resting on the bottom.

Filed under Largemouth, Step by Step
Flies Around The Net – 9-10-2013

The Articumite #6 Black – John Collins

Rubber Leg D Rib Golden Stone Nymph – Carl Pennington

Red Flux Capacitor – Hopper Juan Ramirez

Rainbow – John Collins

Copper St. Francis – Steve Silverio

Chad’s Tarpon Shrimp – Chad Miller

Brown Ghost – Stephen Cullen

Anchovy – Michael McAuliffe

#20 Footprint Dun – Andy Baird
Filed under Classic, nymphs, Saltwater, Streamers, Trout flies