Like the sign said last week at Gates Au Sable Lodge, “Tis noble to fish a Chernobyl.” It’s that time of year where fishing an ant pattern is a great way to go. Even better, a big, bright, gaudy ant pattern like the Chernobyl. Philip Rowley was nice enough to contribute this step-by-step of the Chernobyl Ant to FrankenFly. Phil is an expert in still water fly fishing. Check out his website Fly Craft Angling with Philip Rowley and also his Still Water Fly Fishing Store ran by him and Brian Chan. I would recommend looking at the book section of their store especially if you are doing some stillwater fly fishing. Ok, I’ll let Phil take it from here.
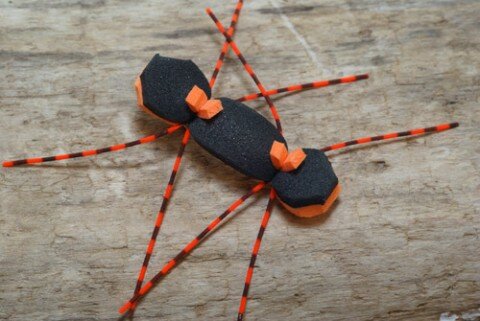
Hook: Mustad R74-9672 #6-#10
Thread: Black 3/0
Under-body: Orange 3MM or 2MM Sheet Foam
Over-body: Black 3MM or 2MM Sheet Foam
Legs: Barred Round Rubber Legs-Hot Orange or White Rubber Hackle
Indicator Posts: Orange 2MM Foam
Tying Notes: This version’s colour scheme is suggestive of the large Pternonarcys stoneflies or salmon flies. Vary the leg, under-body and over-body colors to suggest golden stones and grasshoppers. Gaudy attractor colors also work well.
Cruising through the dry fly bins in most fly shops reveals some bizarre looking patterns, Amy’s Ant, the Club Sandwich and the Fat Albert to name a few. Large, unique and unorthodox, these patterns share two common denominators. They float like corks and utilize large quantities of foam. In recent years foam bodied dry flies have exploded in popularity. This explosion can be traced back to one particular fly designed for the Green River in Utah, the Chernobyl Ant.
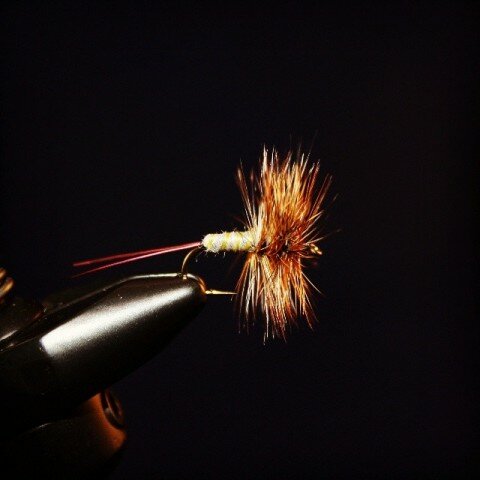
As its name would suggest the Chernobyl Ant resembles a huge mutant ant that trout can’t resist. Simple to construct, the Chernobyl’s long gangly rubber legs and dual layer contrasting foam body screams to be crushed and drowned as it bounces and bobs downstream. From my research the Chernobyl Ant was originally a black bodied fly known in some circles as the Black Mamba. Most versions now feature two colors of foam. Black and orange to suggest large salmon-flies, brown and yellow for golden stones and yellow and tan for hoppers.
Depending upon pattern size and river conditions two hook gape wide slices of 3MM or 2MM closed cell sheet foam is a Chernobyl standard. A straight edge and utility knife provides the most consistent results for cutting the foam strips. Specialized foam cutters can also be used to create size specific foam bodies. I use 3MM foam for #6 and larger Chernobyls, 2MM foam for #8 or smaller. If you are in doubt use thicker foam as it can be thinned by carefully stretching and stroking the foam strip.
Securing foam requires firm thread pressure. Use strong tying thread such as 3/0 to avoid accidental breakage. Cover the shank with thread creating a sound base so the foam doesn’t roll around the shank. Apply thread pressure using a tight, tighter, tightest philosophy so the wraps constrict around the foam strip locking it in place. Pinching and narrowing the foam at the tie in point also helps. Add 6-8 additional wraps at the tie in points. Buoyancy will not be affected. A collection of wide thread wraps at the front and rear tie in areas of the body also helps splay the legs.
There are a number of ways to tie a Chernobyl. I begin by tying in the under-body foam just back from the hook eye. Once the initial tie in is complete wind the thread backwards to the bend using open wraps to segment the body. Secure the over-body, rear set of legs and indicator post at the rear of the hook. Lift the over-body and rear legs out of the way and wind the thread forward to the under-body’s initial tie in point travelling through and further securing the initial body segments. Looking from below the under-body foam should completely envelope the hook shank. To complete the fly secure the over-body, front legs and indicator post in place just behind the hook eye.
Chernobyl Ants ride low and can be difficult to track. Most versions include small foam indicator posts tied in at the front and rear tie down points on the fly. I use thin 1/8 to 1/4 inch wide slivers of 2MM foam for my indicator posts. High visibility indicator posts can be the same color or alternate colors such as hot orange and yellow providing two sighting points. Either color may be more visible depending upon light and water conditions.
The original pattern featured black or white round rubber hackle legs. Mottled or barred legs are now common. I use these legs most often. Mottling your own legs is easy. Place a light colored length of rubber hackle in the jaws of the vise. Pull and twist the leg tight until it wants to double back or furl onto itself. Take a permanent marker and make one single pass down the extended length of the twisted leg material and you have one barred leg. Do not make multiple passes as the leg will not mottle properly.
Rubber hackle stretches when pulled. Take this into account when trimming. If you trim stretched rubber hackle the net result will be short stubby lifeless legs. Gather and support the legs but do not stretch when trimming. Keep your Chernobyl legs about body length as lanky legs are important. Long legs jiggle and bounce providing superior action.
Although a straight forward pattern to tie it pays to use disciplined approach. Incorporating production techniques to prepare and tie in the foam and legs improves your speed, pattern quality and consistency. Once you get rolling it doesn’t take long to produce a succulent handful of Chernobyl Ants.
Tying instructions:
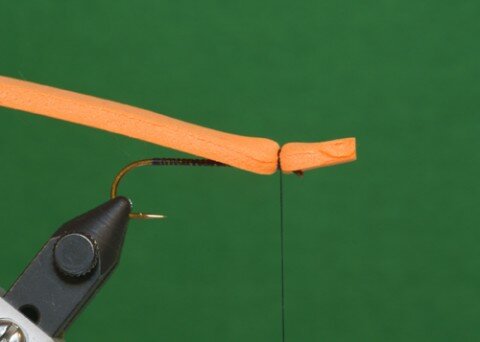
1) Cover the hook shank with tying thread creating a solid thread base. Leave the bobbin hanging two hook eye lengths back from the hook eye. Depending upon your hook size, trim a hook gape wide section of 3MM or 2MM sheet foam for the under-body. Foam thickness depends upon hook size. Use 3MM sheet foam for larger #6 and #4 Chernobyl Ants, 2MM for small versions. Secure the foam strip in place just behind the hook eye ensuring the end of the strip protrudes approximately ½ the shank length in front of the hook. Pinch the foam at the tie in point and use constrictive thread wraps to secure; tight, tighter, tightest.
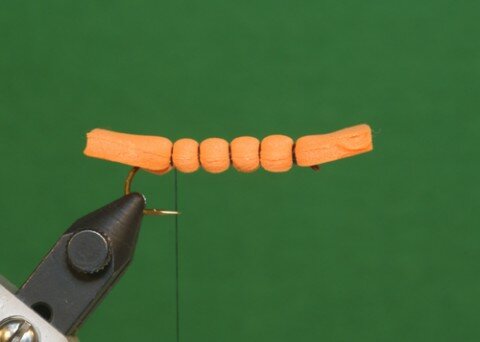
2) Secure the under-body foam down the shank using open wraps to create a segmented appearance. Place 6-8 firm thread wraps at each segment. Leave the tying thread hanging roughly half way between the point and rear of the flattened barb. Trim the foam strip at the rear of the fly so it is 1/2 the shank length.
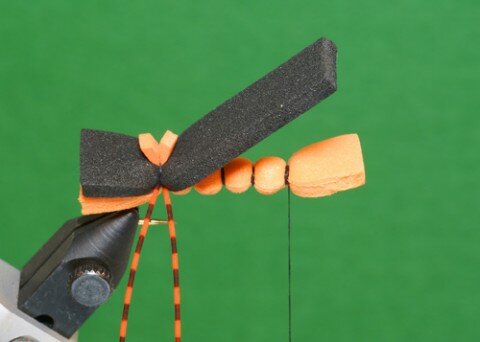
3) Lay the foam over-body on top of the under-body and secure in place at the rear of the hook using the same pinch and constrictive thread wrap process used to secure the under-body. Place additional thread wraps at the initial tie in point to further secure the over-body. The over-body foam strip should be the same width and length as the under-body. Secure a pair of legs on each side of the fly at the rear of the hook. Keep the legs long. They will be trimmed to length later. Cut a thin strip of 2MM sheet foam for the indicator post and bind in place at the rear of the hook, so there are equal amounts of foam on either side of the tie in point. Trim the indicator post so it is roughly 1/8” high. Lift the over-body up out of the way and wind the thread forward over the under-body through each of the body segments. Place additional thread wraps at each segment to further secure the under-body. Leave the bobbin hanging at the initial under-body tie in point. The foam under-body should envelope the hook shank.
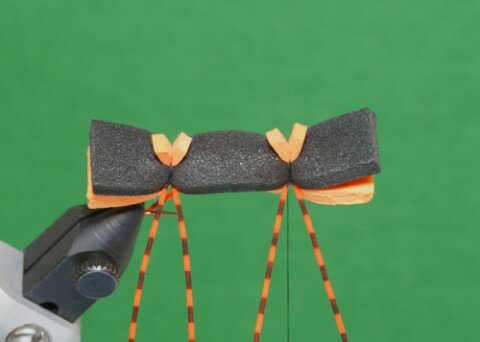
4) Lay the over-body flat on top of the under-body and secure in place just behind the hook eye where the under-body was initially tied in. Bind in two pairs of legs along each side of the body and a 2MM foam indicator post in the same manner as the rear legs and indicator post.
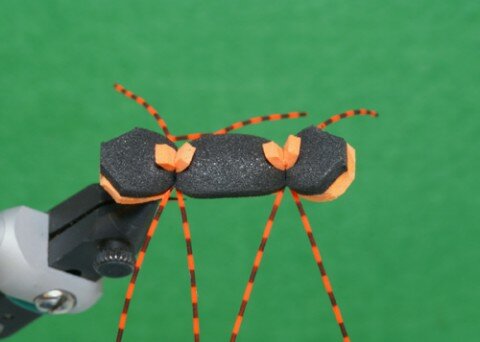
5) Build a neat head at the hook eye under the foam protruding in front of the hook. Whip finish and remove the tying thread. Bevel cut each corner of the finished foam body to form a rounded appearance. Trim the legs so each pair is roughly the same length as the finished body. Apply gel super glue to the head, thread wraps along the under-body and between the extended portions of the under and over-body. Carefully pinch the extended portions of the under and over-body to fuse them together. Remove any excess glue with a dubbing needle and use it to secure the indicator posts.
