Dave Bradley

Dave Bradley is a fly tyer from California who happens to tie some very nice trout flies. He has his own blog called My Trout Fly. You can find some of his work below. Follow the links above each one and it will take you to Dave’s site to see the entire step-by-step for that particular fly.

Also, he has an informative post about how to die your own materials using RIT dye and the microwave.

First, you should check out Dave’s awesome fly tying bench he built himself. To read more details about the bench, just follow the link to Dave’s post.

Dave’s custom fly tying bench


Caddis Pupa Emerger

caddispupaemerger

Caddis Larva

caddislarva

Depth Charge Bird’s Nest

depthbird

Tungsten Psycho

tungpsycho

Dying your own materials using the microwave.

dye

2 Comments

Filed under Trout flies

Bearded Minnow – Pursuit Flies

Copper and Crystal Bearded Minnows

Copper and Crystal Bearded Minnows


Materials:

Tail- Copper/Crystal Flashabou

Body- Copper/Crystal Estaz

Eyes- Lead Eyes (Small- Large)

Wing (Beard)- Barred Rabbit Zonker Strip


When the water clarity is not the best the Bearded Minnow pattern is my go to fly. With a flashy body and a rabbit strip below this fly has plenty of action in the water and really gets the attention of fish.

This fly was first designed for redfish with the copper style but has been developed into a great snook, speckled trout, and bass fly as well. This fly doesn’t have a weed guard so it is best fished around holes and deeper water. This is definitely my go to fly for deeper water reds and fishes great for dock snook as well. This fly works best with constant slow strips to provide a swimming action on the fly.

If you are looking for a great baitfish pattern for a variety of fish check out the Bearded Minnow! Also be looking for more color options soon!

Check out Pursuit Flies for more great patterns!

IMG_7849


Comments Off on Bearded Minnow – Pursuit Flies

Filed under Saltwater, Streamers

The High Tie Clouser – Henkie Altena

South African fly tyer, Henkie Altena, ties a slick High Tie Clouser. Sit back, relax, and watch Henkie tie.

2 Comments

Filed under Saltwater, Step by Step, Streamers

Griz’s “Red Headed” Prince

redheadprince

Hook: Natural Bend Nymph Hook, Sizes 10 – 14
Thread: 140 Denier or 6/0 Black
Head: Red Glass Bead (with silver liner)
Tail: Black Goose Biots (can use Turkey)
Rib: 26 gauge red wire
Body: Hareline STS Trilobal Bloody Black Leech dubbing
Wing: 2 White Goose Biots
Hackle: Olive or Brown Dry Fly Hackle

This fly was my second ever design or enhanced; that was about 15 – 18 years ago for fishing on the Huron River in Michigan for Smallmouth and various Panfish. But to my enjoyment I had great luck fishing other rivers in Michigan for Trout with this fly and in the Smokey Mountains for Trout. This is probably one of my go-to flies that are always in my box. If you wanted to, you can substitute a heavier bead in front that is red to get down deeper in the water.

schottsielogo

Comments Off on Griz’s “Red Headed” Prince

Filed under nymphs

Rite Bobbin review

myRiteB

Bill Merg, a German born and educated Manufacturing Engineer and master fly tyer conceived the Rite Bobbin in 1965. After spending several years perfecting the design, Bill with his wife Eva, began Merco Products in Sunnyvale, California in 1993.
Lyle Graff, a retired airline pilot, first met Bill Merg when he had an issue with one of his bobbins. In 2006 the Mergs retired, selling and assisting Lyle, the new owner of Merco Products. They have not altered the original concept created by Mr. Merg.

If you are a fly tyer, it doesn’t take long to notice Rite Bobbins. You might see the one arm design or the four leaf gold dial in other tyer’s hands or hanging from their vise. When people ask for a bobbin recommendation, a Rite is commonly suggested.

The main advantage Rite has over other bobbins is the adjustable tension that allows thread control. This is a spring drag system controlled by a dial on one side of the thread spool.

http://www.ritebobbin.com

All Rite Bobbins are manufactured in the United States. Merco manufactures five models including Standard, Shorty, MAG, Cermag and Half Hitch MAG. The Standard and the Shorty are identical except the Shorty is well…shorter. The Shorty is made for smaller flies and smaller hands, but you may even want to use one if you happen to like shorter bobbins. Both are ceramic bobbins created with the strongest ceramic available. Rite uses zirconia to make their ceramic tubes for their bobbins. I’m sure you have heard of zirconia, it’s what they make fake diamonds from. The type you would rather buy for that special someone, because it’s much cheaper, but the ladies would despise you for it! Anyway, it happens to be the material that makes ceramic extremely strong. You can use wire bobbin threaders in these particular ceramic tubes without worry.

The Cermag has a longer reach with an extended ceramic insert. It has a high pressure click drag system and heavy duty thread tension. If you’re looking for a ceramic bobbin to spin deer hair for example, this one is recommended.

If you need a stronger bobbin, you can go with the next model, which is the MAG Bobbin. Originally designed for saltwater fly tying, the tube is made of stainless steel. The thread tube is also larger in diameter and is a good choice to use with yarn.

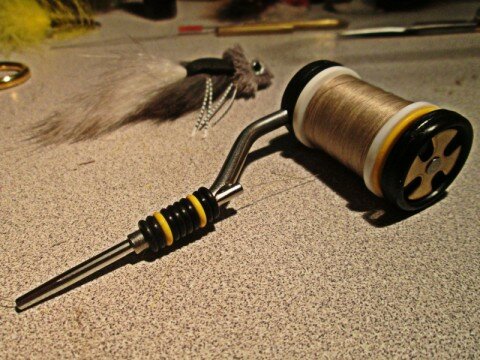
Besides the four basic models, Rite has added their latest creation. I have fallen in love with this bobbin. It’s the Half Hitch MAG Bobbin. This essentially is the MAG Bobbin with a couple of other features that puts the icing on the cake. It has the strong stainless steel tube like the MAG, but the barrel is tapered to allow thread to slide off the barrel to help you tie half hitch and whip finish knots. After the legendary Joe Humphries visited Lyle and showed him the technique of using the barrel of a bobbin to tie these two knots, the design of the tapered barrel came to life. In the following video, Lyle demonstrates this technique.

Another feature of the Half Hitch MAG are the colored o-rings. These rubber rings act as a thread keeper when the bobbin is not in use. They act as a functional grip for the tyer as well. I have used both of these features myself. One other thing about the o-rings are the colors. If you have multiple bobbins you can use the colors to easily tell them apart.

I have used the Half Hitch MAG and the Standard and really like both models. I like them so much that I will not be going back to using my other bobbins. As I already stated, the Half Hitch MAG is definitely my favorite. The other thing I like about Rite Bobbins is the diameter of the barrel. I can usually thread the bobbin without using a threader. You can place the thread enough inside the barrel to suck it up through to thread the bobbin. This works especially well with the stainless steel tube. I didn’t think the tension control would be a big advantage, but I enjoy using it and found that it’s a huge advantage since I don’t have to worry about how tight a two-armed bobbin holds onto the thread spool.

The only downside to Rite Bobbins I found was the cost. The price is higher than other bobbins, but after using them for myself, I believe they are well worth the extra price. They provide added features and Merco guarantees them for life. Here’s what owner Lyle Graff says about the pricing of his bobbins.

“The bobbin is the fly tyer’s most important tool and in hand far more than any other tool.  That is where a great tool will become a pure joy and pay for itself many times. Our goal is that they become heirlooms for the tyer’s grandchildren, cheap at $22.00-$32.00 bucks.”

To follow-up my review, I think you will find this video from Tightline Productions helpful. By viewing it, you can get a better view of some of the items I was explaining. I hope you enjoyed the review and thank you for reading FrankenFly!

2 Comments

Filed under Product Review

Schultzy’s Fate Fish


Schulzbaitfish

Mike Schultz of Schultz Outfitters tied his summer time off colored water baitfish pattern he calls Schultzy’s Fate Fish. His detailed instructions follow.

Rear Hook: Daiichi 2546 Size 4 or 2
Front Hook: Daiichi 2546 Size 1 or 1/0
Eyes: Small Pseudo Eyes, Real Eyes or iBallz, I hate lead… It BREAKS!
Connection: 30- 45lb American Fishing Wire or Rio Bite Wire DON’T use the CHEAP Stuff.
Beads: Small Round, The ones we stock at SO.
Tail 1: Small clump of Buck Tail to prevent fouling as well as adding to the life of the fly if the feathers break off.
Tail 2: 4 Saddle Hackles, Multiple colors are always nice.
Rear Body: 2 Wrapped marabou feathers, preferably shorter than the ones used on the front to give the fly a tapered look. White first then color of choice.
Rear Flash: Flashabou, Mirror Krinkle Flash or New Age Holo Flash from ORVIS
Connection Cover: Flash
Front Body: 1 White Wrapped Marabou Feather, followed by a large piece of Schlappen wrapped for bulk.
Optional Rattle: Tie in on top at this point and glue, Glass or plastic 3MM.
Front Body continued: Wrapped Marabou followed by another wrapped Marabou in a contrasting color.
Front Flash: Tied in around the Marabou
Throat: Red Ice Dub (NOTE: NOT IN FLY PICTURE)
Head: Long magnum rabbit trimmed off leather and spun in a dubbing loop. Figure 8 around the eyes.

TIPS: Fish on a Rio Outbound Short Floating Intermediate with a 4-5ft hand made leader. I use 25lb 18″ to 20lb 18″ to 16lb or 12lb 18″ SIMPLE.

Tie sparse! Don’t over do the Marabou and disrupt the “Swim” of the fly.

Fish down and across, cast into slack water and swim the fly sweeping it through the seam then out into the current. A Strip Pause retrieve is best this time of year.

DON’T go too HEAVY with the weight, If large eyes are used the fly won’t “Swim”. It will JIG which will catch fish but IMO not as many.

Proven color combos…
ALL White “Ghost Minnow” with red throat & plenty of FLASH
Chartreuse & White
Gray & White
Olive & White
Black & White
Use different hues throughout the fly to create multiple “targets” for predator fish. Multi colored flies will out fish solid colored patterns.

Good luck!

Comments Off on Schultzy’s Fate Fish

Filed under Largemouth, Smallmouth, Streamers

Articulated Fish-Spine – first flies

So fly tyers are starting to get their hands on the new Flymen Fishing Articulated Fish-Spine. Here are some of the first flies coming out of tyer’s vises.

MarceloMorales-Rainbow-GC

Marcelo Morales tied this rainbow trout.

helmet-spine

John Collins tied this striped version using a sculpin helmet.

RearEnderRabbit-JohnCollins

John Collins then went with the Fish Skull. He’s calling this one the “Read End” Rabbit since it has a hook riding in the tail.

Peacock-PhilippeRossolin

Philippe Rossolin tied this baby peacock bass using Enrico Puglisi products and Congo Hair.

CastersFlyShop

This one came from Casters Fly Shop. You can see the segmentation.

caseyryan

Casey Ryan put this one together. He used CCT body fur to create the body and yellow streamer hackle for the tail to imitate the yellow tail of the threadfin shad.

MarkDefrank

Mark DeFrank used Hareline Ice Dub & Glo Bug Yarn to create this look. This would make an excellent goby imitation.

MikeSchmidt

Mike Schmidt tied this little guy as soon as he got his hands on the new spines.

pike

Dougie Loughridge tied this big pike fly and it didn’t scare this brave little pike!

It will be interesting to see what will be created with these new Fish-Spines in the future. There are a lot of possibilities with this new product and tyers are just now starting to tap into them. There should be some stunning new flies coming within the next year!

3 Comments

Filed under Streamers

BLONDES AND BEYOND by Mike Rice

If I was limited to fishing with one fly, it would be the Brooks Blonde, most likely the all white version known as the Platinum Blonde. Why? Because it’s simple, quick to tie, effective in just about every fishing environ and because it just plain works. I have used this fly up and down the east coast, the Bahamas and the Dominican Republic for stripers, blues, albies, jacks, snook, ‘cuda, smallies, largemouth and pickerel.

Originally tied by fishing legend Joe Brooks for striped bass in Chesapeake Bay back in the 1940’s, the Brooks Blonde has been used in nearly every saltwater and freshwater fishery and has been responsible for over two dozen world record catches. The Blonde is actually a series of flies, the most well known being the aforementioned Platinum Blonde, the Argentine Blonde (light blue over white), the Honey Blonde (all yellow) and the Irish Blonde (chartreuse or green over white). The beauty of this pattern is that it can be tied quickly on any color combination to match the prevalent bait and can easily be cut down and thinned on the water if necessary. The first Blondes were tied before flash materials were available. The addition of flashy body material and wing flash give an already productive fly a little more punch.

In my opinion the Brooks Blonde is the “chassis” upon which many different patterns have been built upon over the years. For this reason, when I teach tying classes, the Blonde is the first pattern we cover. From this fly it is a natural progression to the Clouser, Juvie, Deceiver, Mushmouth…the list is endless. With the addition of just a few steps and materials, the Blonde can be altered to provide you with 4 baitfish profiles that will cover most scenarios. For the fly tier just starting out, all that is really needed to generate these four patterns (and they will all catch fish consistently) is a RUSH CD, a white bucktail and a package of Flashabou.

Turn on the CD, I recommend “Permanent Waves”. Here we go:
(Check out Mike’s Mud Dog Saltwater Flies website)

BrooksBlonde

BROOKS BLONDE

RECIPE

Hook #1 to 4/0
Thread Danville’s Fine Monofilament
Tail White Bucktail
Body Pearl Saltwater Flashabou
Wing Bucktail, color of choice
Flash Krystal Flash or Flashabou
Head Black thread, head cement or epoxy

TYING SEQUENCE

  1. Wrap hook shank with mono, tie in a clump of white bucktail on top of hook shank. Wrap from hook eye back to just above hook point pushing down on bucktail to roll it around the shank.
  2. Run a thin bead of glue/head cement over the wraps, tie in a strand of pearl Flashabou and palmar wrap from the back end to the hook eye. I like the Flashabou in lieu of bodi-braid or similar because it’s more cost effective per fly and it will take on the colors of the wing material.
  3. Fold in a couple of strands of Krystal Flash at the hook eye.
  4. Tie in a clump of your choice of color bucktail for the wing. Create a head about a 1/8” in back of the hook eye.
  5. Cover with black thread and cement or epoxy.


From this, add a few different steps and start building your arsenal.

SandEel

BUCKTAIL SAND EEL

This pattern is truly born from the Blonde and bridges the gap to the next pattern.

RECIPE

Hook: Favorite 1/0 or 2/0 standard shank
Thread: Danville’s Fine Monofilament
Tail: White Bucktail
Body: Pearl Saltwater Flashabou or Bill’s Bodi-braid
Wing: Olive Bucktail
Topping: Peacock Herl
Flash: Pearl Krystal Flash
Throat: Red Krystal Flash
Eyes: 3/16 molded holographic, black pupil on silver

TYING SEQUENCE

  1. Cover the hook shank with thread, Tie in a clump of white bucktail on top of the hook shank. Wrap the bucktail with thread back to just above the hook point.
  2. Tie in a strand of Saltwater Flashabou or bodi-braid at the end of the bucktail wraps, coat the bucktail wraps with head cement and palmar wrap the Flashabou forward to the hook eye. Fold in two strands of pearly Krystal Flash at the hook eye.
  3. Tie in a clump of olive bucktail (or your color choice for the wing).
  4. Turn the fly over and tie in a few strands of red Krystal Flash at the throat.
  5. Turn the fly back over and tied in a few strands of peacock herl on top of the wing. Wrap back softly about and 1/8” in back of the hook eye and then tie off
  6. Attach eyes with Goop and let set up.
  7. Epoxy the head or cement it.

Deceiver

BUCKTAIL DECEIVER

This can be as fully dressed as you want and as long as you want depending on the length of the bucktail that you have on hand.

RECIPE

Hook: Favorite standard shank
Thread: Danville’s Fine Monofilament
Tail: White Bucktail
Wing: Choice of color of Bucktail
Flash: Pearl Krystal Flash
Throat: Red Krystal Flash
Eyes: molded holographic, black pupil on silver

TYING SEQUENCE

  1. Wrap hook shank with mono, tie in a clump of white bucktail on top of hook shank beginning just forward of the hook point. Make sure to glue/cement the wraps.
  2. Fold in a couple strands of Krystal Flash (pearl) and the glue/cement the wraps.
  3. 1/3 the distance between your last wraps and the hook eye, tie in a clump of colored bucktail on top of the shank to begin the wing followed by a clump of white below (invert the vice) for the belly.
  4. Repeat Step 2.
  5. Repeat Step 3 half the distance from your last wraps to the hook eye.
  6. Repeat Step 5 right behind the hook eye.
  7. Turn the fly over and tie in a few strands of red Krystal Flash at the throat. (If you want to dress the fly up a little, add a few strands of peacock herl or Black Holographic Flashabou to the top for a back, or to keep it simple just tie it off now, cement the head and go fishing.)
  8. Attach eyes with Goop and let set up.
  9. Epoxy the head or cement it.

Clouser

CLOUSER MINNOW

Everything eats a Clouser and every fly box should have at least one chartreuse/white Clouser in it.

RECIPE

Hook: Favorite standard shank
Thread: Danville’s Fine Monofilament
Tail: White Bucktail
Body: Pearl Flashabou
Wing: Choice of color of Bucktail
Flash: Pearl Krystal Flash
Eyes: Hourglass eyes (they will self-center as opposed to dumbbell eyes.)

TYING SEQUENCE

  1. Tie on hourglass eyes on top of the hook shank with figure 8 wraps, leaving about a ¼” bare shank between them and the hook eye. Remember the weight of the hourglass eyes inverts the fly in the water so that it swims hook point up.
  2. Wrap the shank with thread behind the eyes to just above the hook point then wrap back up to the hook eye. Add a drop of glue/cement on the wraps holding the eyes on.
  3. Tie in a clump of white bucktail at the hook eye, bring the clump of bucktail over the eyes so it lies down in the notch between the sides of the eyes and then pinch on to the hook shank and wrap the clump onto the top of the shank back to the hook point.
  4. Tie in a strand of Pearl Saltwater Flashabou over the hook point and then coat these wraps with glue/head cement. Palmar wrap the Flashabou forward to the eyes and figure 8 wrap the eyes with it. Make a couple wraps with it forward to the hook eye, wrap a few times with the mono and clip the tag end of the Flashabou.
  5. Fold in a couple strands of Krystal Flash.
  6. Invert the fly in the vice and tie in a clump of your choice of colored Bucktail as the wing (this will be the top of the fly when it’s in the water). Finish the head off with several wraps and tie off.
  7. Head cement/epoxy the head.


From one fly you now have four “quick-tie” patterns that will cover a broad range of bait profiles, different levels of the water column and all phases of the season.

mudDogFlies_logo

Comments Off on BLONDES AND BEYOND by Mike Rice

Filed under Saltwater

The Founding Flies book now available!

Master Catskill fly tyer Mike Valla has just released his new book, The Founding Flies. Mike grew up near the Catskills and was friends with Walt and Winnie Dette. He grew up learning from the masters themselves. In this book Mike covers 43 American Masters.

foundingflies

I just purchased Mike’s previous book, Tying Catskill-Style Dry Flies and I love it! I’ve been pouring over it. He covers a lot of history, patterns, and if you want to learn how to tie Catskill-Style dry flies, it is a must. So I have no doubt his new book will be just as good.

Mike Valla will be signing books at Dette Trout Flies fly shop in Roscoe, NY on August 10th. Go to the Dette Trout Flies website to see more details.

CVR_FoundingFlies_D1(5)

•    Color photos of the flies plus recipes for nearly 300 flies—a majority original patterns tied by the masters themselves.
•    The flies were developed on waters across America from California to Wyoming to Wisconsin and from Maine to Michigan to Pennsylvania to West Virginia.

 There’s Mary Orvis Marbury, and Thad Norris and Theo. Gordon along with the “Catskill” school of fly tiers. Len Halladay and Art Winnie and Dave Whitlock. Fulsher and Oatman are there, too. There’s Chauncy Lively, Marinaro, Leisenring and Hidy. John Alden Knight and Joe Messinger, Sr. C. Jim Pray and Polly Rosborough and Don Gapen and Franz Pott and George Grant. Buszek and all the others—40 chapters
Mike Valla, author of Tying Catskill-Style Dry Flies (978-1-934753-01-9), has published articles in Fly Fisherman, The American Fly Fisher, and a variety of other journals. He’s written extensively for Eastern Fly Fishing magazine and is the Northeast Field Editor. He lives in Ballston Spa, New York.

tiedbyMikeValla

Comments Off on The Founding Flies book now available!

Filed under Classic, Trout flies

Dave’s Hopper

Daves Hopper

This is a classic hopper designed by Mr. Dave Whitlock. This one was tied by Charlie Craven. Since it’s the middle of summer, I was thinking hoppers and couldn’t think of a better hopper pattern to post than this little darling. This is good to use whenever the grass hoppers are out. Give it a try!

Head over to Charlie’s Fly Box to see a step-by-step of how to tie Dave’s Hopper.

Materials List:

Hook: TMC 5262 #4-12
Thread: GSP 50, Brown
Tail: Red Deer Belly Hair
Hackle: Brown Rooster neck
Body: Yellow Poly Yarn
Wing: Mottled turkey quill, vinyl coated
Legs: Knotted Ringneck Pheasant Tail fibers
Head and Collar: Natural Deer Body Hair, spun and trimmed to shape


Comments Off on Dave’s Hopper

Filed under Hoppers