Tying for Gates Au Sable Lodge, I have made myself well aware of the history of a lot of the flies that Rusty Gates designed and created. This is kind of a tricky one to tie, but with practice, you can master it. I’ve taken some of this information from Tom Deschaine’s old dry fly site, but I’ve also added my own tips here and there.
-Paul
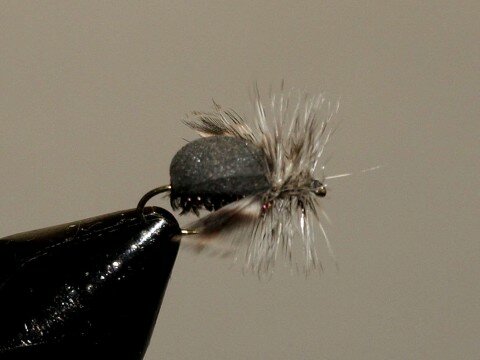
This fly was created by the late Rusty Gates back in the late 1980’s or early 90’s. Rusty’s favorite way to fish this pattern was in tandem. The trailing fly should be about 18” inches behind the 1st fly, and smaller in size then the lead fly.
Materials List:
Hook: Standard Dry Fly. Size: 12-16
Thread: Black, 6/0
Shellback: 2mm Black Fly Foam
Body: Peacock Herl
Wing: Grizzly Hen Tips, tied spent and
swept back.
Hackle: Grizzly
Tie the foam on to the shank of the hook leaving room for the wings and hackle. The foam should extend beyond the bend of the hook. Once the herl body is tied in place, I tie the wings in and pull the foam back over the body and tie it off to form the shellback. The wings are tricky. Take your time and make sure they are in place before tying down the foam to for the back. When tying the peacock herl body. Twist the herl around the thread (like you would dubbing). Wrapping the body in this way makes the body more durable.
This fly was designed to imitate a ‘deer fly’. It can be effective by fishing under cedar trees and under bridges. However, you can fish this when there isn’t any hatches as a general attractor pattern. Give it a go, it is a great floating fly and really buggy looking as you can see.












That’s a great looking fly, I’ll have to tie some up. Thanks for sharing.
Best,
Matt
Thanks Matt, I’m looking forward to seeing them if you tie some up!
-Paul